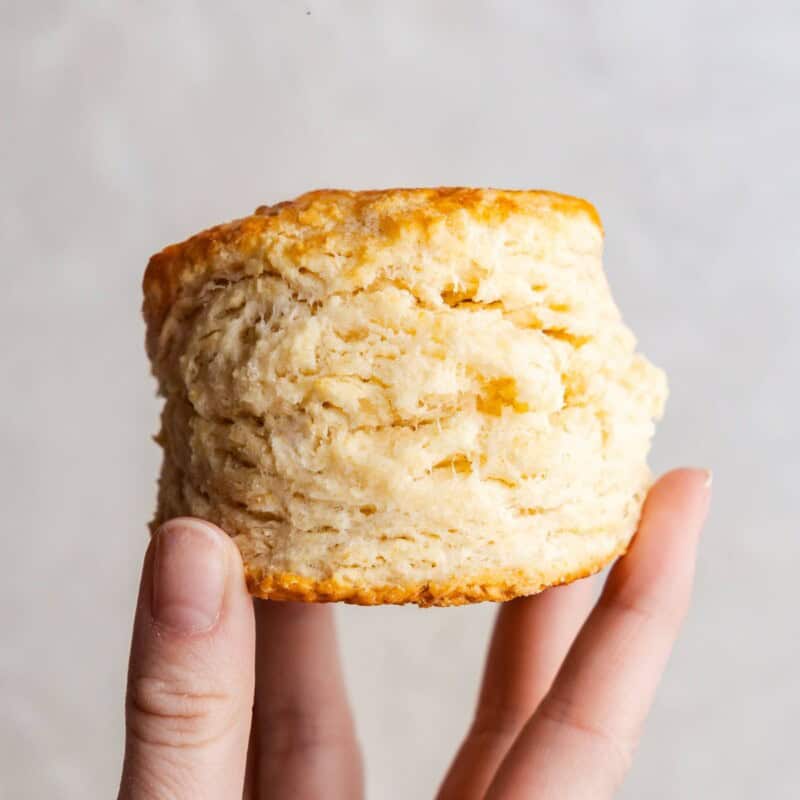
Preheat oven to 425°F (220°C). Use an ungreased baking sheet or line it with parchment paper.
In a large mixing bowl, stir together 4 cups all-purpose flour, 2 tablespoon baking powder, 2 tablespoon granulated sugar, and 2 teaspoon salt.
Grate ⅔ cup butter (cold) using a cheese grater and stir into the flour mixture OR cut butter into small pieces and use a pastry cutter to cut the fat into the flour mixture until it resembles coarse meal or sand.
Gradually pour in 2 cup milk or buttermilk while stirring until the dough just comes together. Avoid overmixing to keep the biscuits tender.
Turn the dough out onto a clean, lightly floured countertop. Gather it into a ball and press it down until it is about 1 inch thick.
Use a circle biscuit cutter or the rim of a drinking glass to cut out your biscuits. Collect any dough scraps, press them back together, and continue cutting until all the dough is used. This recipe makes anywhere from 6 large biscuits to 10 smaller.
Place the cut biscuits onto the prepared baking sheet. Bake in the preheated oven for 12-15 minutes or until the tops are golden brown. The size of your biscuits will alter the cooking time slightly so watch closely.
Remove from the oven and brush the tops with melted butter for added flavor and a glossy finish.
Notes
PRO TIPS:
Keep your butter or shortening as cold as possible. Place it into the freezer for 10 to 15 minutes before using in the recipe for extra flaky results.
Handle the dough with your hands as little as possible.
Work quickly to keep your dough cold. If you need to, pop the formed biscuits into the fridge for 15 to 30 minutes to chill before baking.
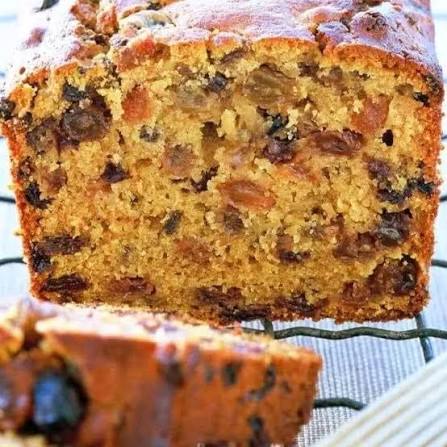
Preheat oven to 300°F and grease an 8-inch square baking dish with nonstick cooking spray.
In a medium mixing bowl, stir together the 1 cup all purpose flour, 1 cup granulated sugar, ¼ teaspoon salt, and 1 teaspoon baking soda.
Add the 1 large egg and 15 oz. can fruit cocktail along with all of the juices from the can. Stir until uniform.
Pour the cake batter into prepared baking dish. Sprinkle the ½ cup light brown sugar over the batter.
Bake for 60-70 minutes or until a toothpick inserted into the center comes out with just a few moist crumbs.
Allow to cool for 10-15 minutes before serving on its own or with whipped cream or ice cream.
Notes
You can easily reduce the sugar in this recipe if your want. The granulated sugar can be reduced to 2/3 cup and 1/4 cup of brown sugar can be used on the topping.
Feel free to stir in a little bit of cinnamon and nutmeg and/or ginger if you like a spicier cake.
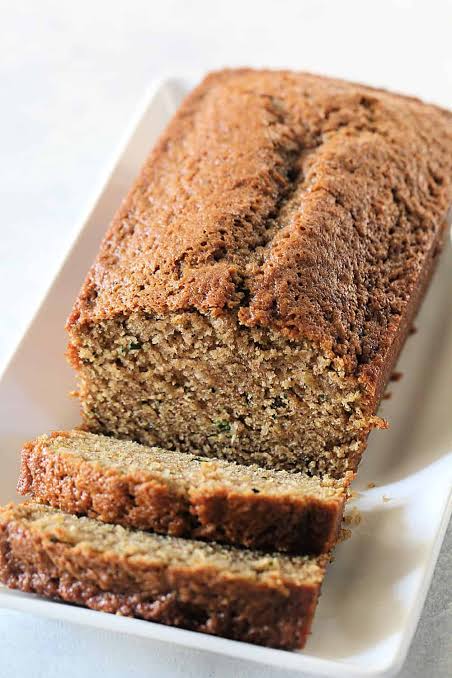
Turn your garden harvest into a treat! We’ll teach you how to make zucchini bread that’s perfectly snack-able.
Ingredients
2 cups sugar
3 cups all-purpose flour
1 teaspoon salt
1 teaspoon baking soda
1 teaspoon ground cinnamon
1/4 teaspoon baking powder
————————————————–
1 cup canola oil
3 large eggs, room temperature
2 teaspoons vanilla extract
1 teaspoon grated lemon zest
2 cups shredded zucchini (about 2 medium)
1/2 cup chopped walnuts or pecans
Directions
Preheat oven to 350°. Grease two 8×4-in. loaf pans. In a large bowl, beat sugar, oil, eggs and vanilla until well blended. In another bowl, whisk flour, salt, baking soda, lemon zest, cinnamon and baking powder; gradually beat into sugar mixture, mixing just until moistened. Stir in zucchini and walnuts.
Transfer to prepared pans. Bake 55-65 minutes or until a toothpick inserted in center comes out clean. Cool 10 minutes before removing from pans to wire racks to cool.
Meals are even more memorable when I compliment them with this light zucchini bread with pineapple. The zucchini makes it so moist and tender…and the pineapple lends a delicate tropical twist to every delicious slice. —Shirley Boulet, Whitefield, New Hampshire
Ingredients
3 cups all-purpose flour
2 cups sugar
2 teaspoons baking soda
1-1/2 teaspoons ground cinnamon
1 teaspoon salt
3/4 teaspoon ground nutmeg
1/2 teaspoon baking powder
3 large eggs
1 cup canola oil
2 teaspoons vanilla extract
2 cups finely shredded zucchini
1 can (8 ounces) crushed pineapple, drained
1 cup chopped nuts
1 cup raisins, optional
Directions
Preheat oven to 350°. Coat two 8×4-in. loaf pans with cooking spray; dust with flour, tapping out extra.
In a large bowl, combine the flour, sugar, baking soda, cinnamon, salt, nutmeg and baking powder. In another bowl, whisk the eggs, oil and vanilla. Stir into dry ingredients just until moistened. Fold in the zucchini, pineapple, nuts and, if desired, raisins.
Transfer to prepared pans. Bake until a toothpick inserted in the center comes out clean, 50-60 minutes. Loosen sides from pans with a knife. Cool in pans 10 minutes before removing to a wire rack to cool.
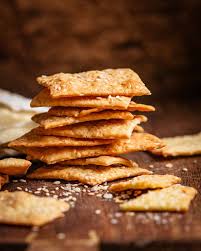
1 1/4 cups flour Whole wheat, fresh ground, all-purpose, or use your favorite gluten-free blend.
1/4 teaspoon onion powder
1/4 teaspoon garlic powder
1/4 teaspoon chili powder
1/4 teaspoon smoked paprika regular paprika works as well
4 Tablespoons butter
1/4 cup water
1 Tablespoon honey
sea salt I love Redmond Real Salt. Use code “Pioneering” for 15% off. Instructions
Preheat oven to 400°F.
Measure flour and seasonings into a large mixing bowl.
Add cubed butter and cut in with a pastry cutter or two butter knives until it looks like pea-sized clumps.
Add water and honey, stir until just combined. Pro Tip: A few crumbly or dry pieces are fine, they’ll incorporate as you knead the dough together a few times.
Place the ball of dough on a baking sheet or stone. Roll dough out until it’s 1/16th to 1/8th of an inch thick. Pro Tip: Press harder from the center of the dough and lighter as you reach the edges to try and maintain the same thickness throughout.
Use a pizza cutter and cut into desired shapes.
Pierce each cracker with the tines of a fork to keep them from puffing up.
Sprinkle with sea salt or additional seasonings and bake at 400°F for 10 minutes.
After 10 minutes, remove the outer crackers to keep them from burning and return the rest to continue baking, if needed, for 2-3 minutes.
Allow the crackers to cool completely on the baking sheet. Once completely cool, transfer to an airtight container and store for up to a week.
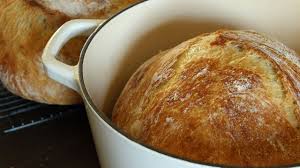
Make bakery-style no knead artisan bread at home with just 4 ingredients and no mixer needed! This easy Dutch oven bread has a crispy crust, chewy crumb, and incredible flavor. Perfect for beginners, soups, sandwiches, and everyday homemade bread baking.
Servings32 servings-Calories93 kcal
Ingredients
3 cups water lukewarm (about 120 degrees)
1 1/2 Tablespoons yeast
1 1/2 Tablespoons salt kosher or coarse sea salt is best
1 1/2 Tablespoons apple cider vinegar
6 1/2 cups flour unsifted, all-purpose or bread flour (see notes for whole wheat) Instructions
1. In a large bowl, dissolve yeast and warm water. Allow to sit for 6 to 8 minutes until water is foamy.
2. Add salt and vinegar. Mix in flour a cupful at a time until it’s all incorporated. Dough will be slightly wet.
3. Cover your dough with a tea towel and set it on top of the fridge (or a draft free warm place) to rise for about 2 to 3 hours, or until the dough has at least doubled in size.
4. Cover dough (make sure it can still breathe, don’t seal completely) and place in fridge for 8 hours.
5. Take 1/2 of the dough (or 1/3 for a smaller loaf) out of the bowl, it’s very wet, so lightly flour your hands, and pull it into the shape of your loaf. Dust the top with flour and slash it with a sharp knife (flour keeps your blade from sticking) and let it rise for about 40 minutes.
6. Preheat oven to 450°F with cast iron Dutch oven inside.
7. Remove dutch oven from stove and carefully place one loaf into Dutch oven. Cover with the lid and bake for 25 minutes, remove lid and bake for another 10 minutes until golden on top. (No cast iron Dutch oven, see notes for alternate baking instructions)
Recipe Tips:
If dough feels too sticky to handle, dust lightly with flour. A wetter dough creates the best artisan texture, so resist the urge to add too much flour.
Long fermentation builds flavor naturally. For extra flavor, refrigerate the dough after the first rise for up to 3 days.
Preheating the Dutch oven creates steam for that crisp crust.
If you don’t have a Dutch oven, you can use a cookie sheet for your bread (parchment paper is still helpful), and place a metal broiling pan on the lowest rack in the oven. Preheat both pans to 450°F. Put your loaf in the oven, then quickly pour a cup of HOT water into the broiler pan and shut the oven. Bake for 45 minutes.
Use parchment paper for easy transfer.
Try to wait at least 20 minutes before slicing into your loaf. If you slice into a hot loaf, you’ll end up with a gummy center that will seem underbaked.
If you’re not a fan of the crispy, crunchy crust, you can immediately brush your loaf with butter as soon as it comes out of the oven. This will soften the crust just a bit, making it less crunchy. Storage Instructions:
This no-knead artisan bread is best enjoyed fresh, but it stores well if you have leftovers. Keep the loaf at room temperature in a linen bread bag, wrapped in a clean kitchen towel, or loosely covered on the counter for up to 2 days. This helps preserve the crust while keeping the inside soft.
I don’t recommend storing bread in the refrigerator, as it tends to dry out much faster and lose its fresh texture.
For longer storage, slice the loaf first, then place it in an airtight freezer-safe bag or container and freeze for up to 3 months. When you’re ready to enjoy it, thaw slices at room temperature or pop them straight into the toaster.
Check out how to store homemade bread for a complete guide to keeping it fresher longer. Nutrition
Calories: 93kcalCarbohydrates: 19gProtein: 3gFat: 1gSaturated Fat: 1gSodium: 329mgPotassium: 29mgFiber: 1gSugar: 1gCalcium: 4mgIron: 1mg
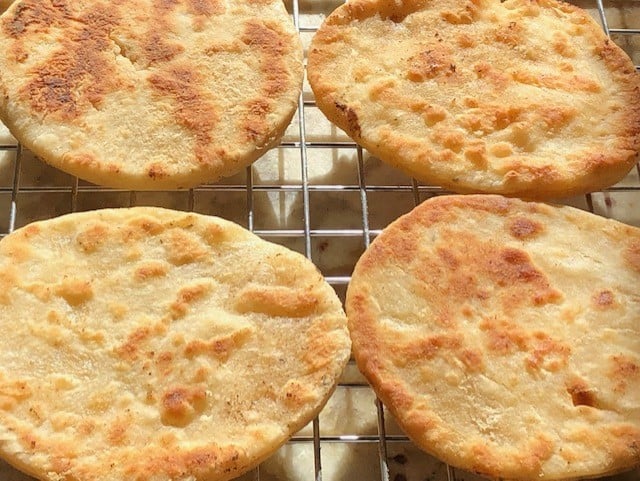
Easy 2-Ingredient Naan right at home! These soft and fluffy naan are so simple to make, you can turn them into garlic naan too and still use less than 5 ingredients! Perfect to serve with stews, butter chicken curry or chana masala! Recipe Tip
If you don’t have self-rising flour, you can use regular flour and make your own self-rising flour.
Start with 3 ¼ cups all purpose flour, add 5 teaspoons baking powder and 1 teaspoon of kosher salt. You’ve got homemade self-rising flour.
Servings: 10 naan
Calories: 241
Ingredients
• 3 ⅓ cups self-rising flour
• 1 ½ cups plain greek yogurt
• 2-4 tablespoons water
• oil for brushing (optional)
• 1 teaspoon flaked salt for topping (optional)
Instructions
1. DOUGH: Combine the self-rising flour and greek yogurt in the bowl of an electric mixer fitted with the hook attachment. This can also be done by hand using a silicone spatula. Mix the ingredients until the dough starts to form. If the dough is dry, add 1 tablespoon of water. Continue to knead and bring the dough together. If the dough is still barely holding together, add another tablespoon of water. Repeat with more water if needed, until the dough comes together.
2. ROLL: Dump the dough out onto a clean, lightly floured surface. Work the dough out into a large disc. Divide the dough into 10 equal pieces. Roll each piece out until it is about 1/3 inch in thickness and has a 6-inch diameter.
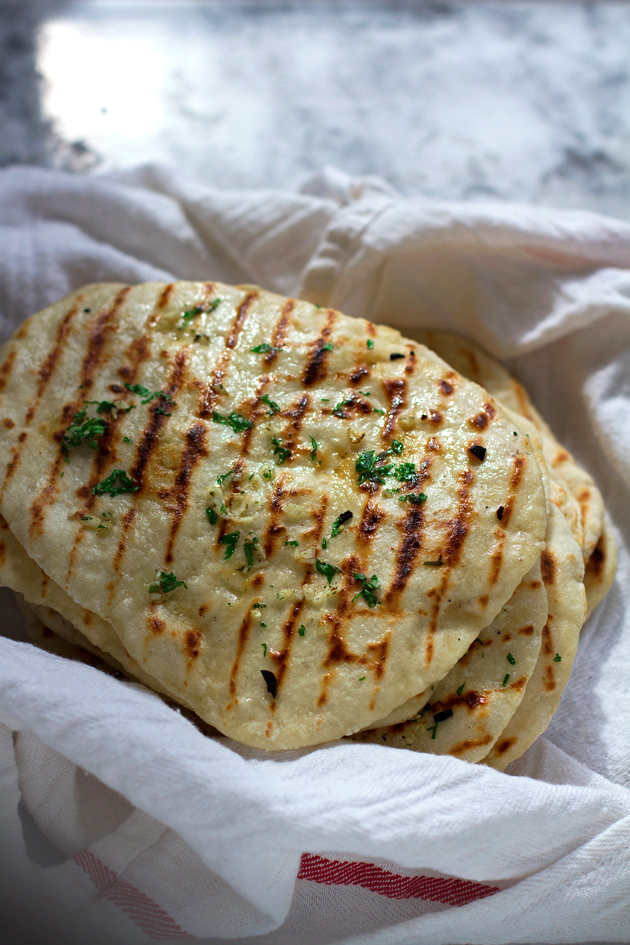
3. FLATBREAD: Place a griddle pan over medium-high heat and let it get very hot. Cook the naan on each side for about 2 minutes. The flatbread should puff up and have a light char. If desired, brush each side with olive oil and a small pinch of sea salt. See notes for flavor variations! Notes To make garlic naan:
Combine the 2 tablespoons oil (or melted ghee/butter)
2-3 cloves grated garlic,
2 tablespoons chopped cilantro, and a pinch of salt in a bowl; stir. Once the first side of the naan is cooked, flip the naan over and brush the cooked side with the prepared garlic oil. to make sesame naan: brush with a little olive oil when the naan is done cooking and sprinkle 1 side with sesame seeds. Place the sesame seed side of the naan onto the cooking surface for just a few seconds to seal the sesame seeds into the surface of the naan. Nutrition
Calories: 241kcal | Carbohydrates: 31g | Protein: 8g | Fat: 9g | Fiber: 1g | Sugar: 1g
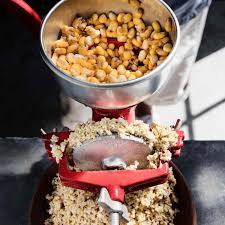
This recipe only required four ingredients; corn, fresh water, pickling lime (cal), and salt. The salt is in fact not necessary, or particularly traditional, but we find it enhances the flavor of the tortillas without compromising them in any way. The basic process is to mix the corn with the water and lime, boil the corn till the seed coat (pericarp) slips easily from the kernels, then leave the corn to soak for a minimum of 8 hours. After soaking, the corn is rubbed to remove the softened pericarps, and rinsed several times to remove them and lower the pH and remove the unreacted alkali/lime. Then the corn is drained, the salt is added, and it is ground in the masa grinder. If you don’t possess a masa grinder, a food processor or meat grinder can be used. Traditionally the corn would be ground by hand on a mano and metate stone grinding mill, but these are almost completely unavailable outside Mexico, and are rather labor intensive to use. Once ground to sufficient fineness, the resulting dough is called masa. The masa dough is shaped into balls the size of the desired tortillas and baked/roasted on a hot griddle till cooked thoroughly. All of the steps of the process can vary a bit depending on a number of factors, so they should be considered as general guidelines vs a hard and fast recipe. Different corns nixtamalize at different rates, and are perhaps best suited to specific cooking styles. This can only arrived at by a bit of trial and repetition.
2 cups plain cornmeal
1/2 cup all-purpose flour
2 teaspoons baking powder
1/2 teaspoon baking soda
1 teaspoon salt
2 eggs
2 tablespoons oil or melted butter (bacon grease works beautifully here too)
2 tablespoons honey
1 3/4 cups buttermilk
1/4 cup oil or butter (or reserved bacon grease) for the skillet
Directions
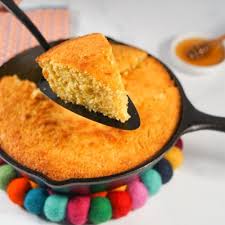
Preheat the oven to 400°F. Place a 10-inch cast iron skillet on the stovetop over medium-high heat and add the 1/4 cup fat. Heat until hot and shimmering.
In a large bowl, whisk together the cornmeal, flour, baking powder, baking soda, and salt.
In a separate bowl, whisk the eggs, 2 tablespoons fat, honey, and buttermilk.
Pour the wet ingredients into the dry and stir just until combined.
Carefully pour the batter into the hot skillet. It should sizzle immediately.
Transfer the skillet to the oven and bake for 25 minutes, or until golden on top and set in the center.
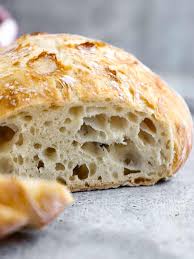
Prep time: 10 minutes Rise time: 2 hours (or up to 48 hours refrigerated) Bake time: 42 minutes Yield: 1 large round loaf
Ingredients 3 cups bread flour (450 g) 2 teaspoons salt (12 g) 2 teaspoons yeast (6 g) 1 1/2 cups warm water (360 g), divided if proofing yeast
Instructions
If using active dry yeast, dissolve the yeast in 1/2 cup (120 g) of the warm water and let it sit for 5 minutes until bubbly. If using instant yeast, you can skip this step and mix the yeast directly into the flour.
In a large bowl, combine the flour and salt and stir to mix.
Add the yeast mixture (or dry yeast, if using instant) and the remaining warm water (1 cup / 240 g).
Stir until a sticky, shaggy dough forms and there are no dry patches of flour.
Scrape down the sides of the bowl. Cover loosely with a damp towel or plastic wrap.
Let rise at room temperature for 2 hours, until doubled and bubbly.
For better flavor, after 2hr rise on counter, place the covered bowl in the refrigerator for at least 8 hours and up to 48 hours. When ready to bake, remove from the fridge and let sit at room temperature for about 1 hour.
Preheat the oven to 450°F (230°C). Place a Dutch oven with the lid on inside the oven to preheat for at least 30 minutes. If you don’t have a Dutch oven, place a pan with 2–3 cups of water on the bottom rack to create steam and set a baking sheet on the rack above it.
Lightly flour a work surface (about 1 tablespoon of flour). Scrape the dough out onto the surface and gently fold it over itself to form a rough round.
Place the shaped dough onto a piece of parchment paper.
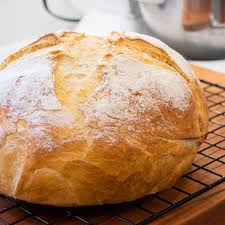
Carefully remove the hot Dutch oven from the oven. Lift the parchment and place the dough into the pot. Cover with the lid.
Bake for 30 minutes with the lid on.
Remove the lid and bake for 12 more minutes, until deeply golden and the internal temperature reaches 205°F.
Remove the loaf and cool on a wire rack. For best texture and shelf life, allow to cool fully before slicing. If you don’t have the self-control for this, I really do commiserate.
Use only distilled water. Flour must be unbleached Yogurt, with active cultures or buttermilk
5-6 TB yogurt
A little water till consistency of cream
Pinch of caraway seed – helps with fermenting
Stir
Add flour (rye is best for fermenting) whole wheat is also good (½ rye ½ whole wheat is great a small sprinkle of rye or whole wheat spelt)
Use enough flour mix a bit at a time till consistency of a thick pancake batter.
Loose lid on top – place in warm place (at least 70 degrees) – stir every couple days.-for about a week.
Brownish water on top (called hooch) and mix in to starter real well, if starter too thin, add a tad of flour till it is the heavy pancake thickness again.
Every day Stir starter, ck to see if it needs more water or flour.
Day 4 should smell yeasty and sourdough-ish.
Day 5 mild yeasty smell and ready.
Stir in enough flour at end of starter ferment for storage, to make batter super dry and stir it really good. When dry as possible pour at least a ½ ot 1 c. flour on top, seal type lid on top, and store in frig. Use once or twice a month if possible. Why Did my Starter Grow Mold?
Sterilize everything well before starting
Mold in air
Mold in wheat flour
Using Starter and bread making.
Add water and work it into the mixture until thick pancake batter consistency again.
Leave overnight For 1 loaf round Bread
1C Milk
2Tb Butter
1 ½ Tsps. salt
2 Tb honey
3 ½ cups flour
1 Cup Sourdough starter
You may need to add 2-3 Tb of water depending on the type of flour that you use.
2 rise periods
Scar bread with razor blade
Bake at 400 degrees for about 40 min.
This emergency bread is a life-saver in its simplicity. You need only three ingredients (two if you don’t count water as an ingredient. For our batch, you will need:
2 cups of flour (any type)
1/2 teaspoon of salt
1/2 cup of water
Instructions:
Combine Flour & Salt: Reserve a small amount of the flour for later use. Combine the salt and most of the flour in a mixing bowl.
Add Water: Add the water to the flour, stirring until the mixture becomes crumbly or begins to clump together. Start with the specified amount of water and add more as needed. Different flours like whole wheat, rye, sorghum, barley, or stone ground may require more water to get the same dough ball consistency and elasticity. I use a spatula to start the process of mixing the ingredients.
Knead the Dough: Knead the dough with your hands against the bottom of the bowl until it feels smooth and elastic (3-5 minutes). Add more flour if the dough feels sticky. Add more water by the Tablespoon if you can’t get it to clump together.
Let It Rest: Cover the dough and let it rest for 15-30 minutes to allow the gluten to relax.
Heat the Pan: Start heating your flat cast iron pan over your heat source. My preference is a flat cast iron skillet, but any solid cooking surface will do. Traditionally, people have used anything from shovels to rocks that can withstand the heat of an open fire.
Shape the Dough: Divide the dough into walnut-sized lumps or slightly smaller pieces. That would be a ball that is approximately 2 inches round or less. Roll the balls between your hands to make them round and eliminate creases. Squeezing them slightly will help pull the dough together. You should get 8-10 dough pieces with two cups of flour.
Sprinkle a pinch of the flour you previously set aside on a flat surface (countertop or large wooden cutting board) and press one lump of dough into a flat circle using your hands. Shape the dough into a thin circle by pressing and stretching with your hands. Aim for it to be as thin as possible without tearing the dough. If you have a rolling pin or dowel, you could use that. If you have a tortilla press, you could use that. You can even just mash it and press it as flat as you can between two flat surfaces. The thinness allows you to cook it fast and all the way through.
Cook the Flatbread: Check the temperature of your pan by dropping a small amount of water on it. It should sizzle and evaporate quickly. You want the pan to be as hot as possible to facilitate the swift cooking.
Once the pan is hot enough, transfer the flattened dough onto it. Cook the flatbread, keeping a close eye on it. Flip it when the edges start to curl up or appear dry. You can use a spatula, fork, tongs, or even quick fingers to flip it. Continue cooking until the bread browns slightly on each side. Undercooking it will just give you a doughier textured bread. Overcooking it will make it drier and crispier. A little burn on it actually imparts a little flavor to it.
Serve Warm: Once cooked, transfer the flatbread to a plate covered with a hand towel or cloth napkin to keep it warm and soft. Repeat the process with the remaining dough pieces.
Variations: If you add just one ingredient—a handful of herbs, some wild yeast, or seeds you gathered—or even change the cooking method by frying the dough in oil or dropping it into salted boiling water, you have a completely different bread. The variations of ingredients and cooking methods are limitless.
Rising Version: You need an agent, either yeast pulled from the air as we did in another video or a combination of leavening agents like baking soda and an acid. Here’s the same recipe, but I added a 1/2 teaspoon of baking powder, a 1/2 teaspoon of lemon juice, and then the water. I could substitute the same amount of vinegar for the lemon juice. That small amount of lemon juice does impart just a hint of flavor to the bread. If that bothers you, you could use a different acid, like the equivalent amount of vinegar. I can set the dough aside for about 20 minutes, and when I cook it, the bread will have a little rise. It won’t be as flat.
Fry Bread Version: When it comes to cooking variations for different styles of bread, this basic recipe isn’t too different from traditional fried bread. Consider adding a leavening agent, lightly salting, or dusting the hot fried bread with cinnamon and sugar. Replace the flat cast iron pan with a frying pan. Use any available cooking oil, butter, or tallow to fry the bread instead of dry-cooking it. Here, I use bacon grease. Adjust the heat as needed to prevent burning. Fry until the bread is golden on the outside.
Boiled Version: If you divide the 2-inch round pieces into quarters, you can drop each into a boiling pot of salted water for about two minutes. When you take them out, lightly salt them and eat them as they are, or put them on your hot, flat cooking surface to brown them slightly. Cooking them in this way will change the gluten structures and result in your emergency bread tasting more like a pretzel or bagel.
Changing it with any of these variations or variations of your own will keep you from suffering food fatigue if you ever have to survive solely on these emergency breads. These recipes will give you a baseline to which you can add your own unique twists and additions. Consider using your finished flatbread as you do other breads. Eat it alone or use it as a carrier for other foods: dip it in hummus, put meat in it like a taco, spread peanut butter on it, or whatever else you can imagine. Remember, knowing how to make this emergency flatbread is a valuable survival skill, especially when traditional baking methods are unavailable.
Servings – 10-20 flatbreads (depends on the size & shape of the skillet flatbread that you create).
Ingredients
2 1/2 Cups – All Purpose Flour
1 Teaspoon – Salt
1 Teaspoon – White Granulated Sugar
1 Teaspoon – Baking Powder
2 Teaspoons – Italian Seasoning (dried spices)
1 Cup – Milk
1/4 Cup – Unsalted Butter (softened) – – FYI – 1/4 cup equals 4 tablespoons
Tips:
Optional – If you don’t like or you are out of Italian seasoning, you can add a tablespoon of very finely diced & fried onions or minced & fried garlic. This takes a little more time than adding dried herbs (because you need to dice/mince & fry the onions/garlic) but onion or garlic flatbread is delicious.
One of the commenters below (thanks Lisa!!) made a delicious version of this bread with rosemary & garlic.
No yeast flatbread = a quick flatbread. Why? Because with a no yeast flatbread recipe, you do not have to wait for the dough to rise. Yeast flatbreads can sometimes require 1+ hours for rising (and this makes yeast flatbreads more time consuming). No yeast flatbreads are easier to make… and certainly a lot quicker to make than most yeast breads.
Make sure to mix the dry ingredients before you add the wet ingredients (e.g. milk). This ensures that there are no “pockets” of unmixed baking powder.
Instructions
Add the dry ingredients (e.g. flour, salt, sugar, baking powder & herbs) to a large mixing bowl. Mix dry ingredients together. This helps to spread out the baking powder and prevents small pockets of baking powder being found in the finished bread.
Soften butter in a microwave.
Add wet ingredients (e.g. milk and melted butter) to the mixing bowl. Stir thoroughly with a large spoon.
Use your hands to knead the dough together for 1 or 2 minutes in order to create a nice ball of dough.
Sprinkle some flour on a cutting board in order to prevent the dough sticking to the cutting board (when you roll out the dough).
Place the dough of the cutting board.
Sprinkle a small amount of flour on top of the dough (in order to prevent the dough sticking to the rolling pin).
Use a rolling pin to roll the dough flat. The dough should be no more than 1/8 inch high.
Use a large cookie cutter (or small cake ring) to create circular flatbreads. Or cut the dough with a knife diagonally & vertically (in a tic-tac-toe fashion) in order to create square flatbreads. Use tips below for more information on shaping the skillet flatbread.
Add 1 or 2 tablespoons of oil or butter to a frying pan.
Heat the frying pan with low/medium heat (halfway between the low and medium setting on your range dial).
Place the flatbread dough in to the frying pan. The amount of flatbread that can fit in your frying pan depends on the size of the frying pan & flatbreads.
Flip all of the flatbreads in the pan every minute in order to prevent burning. Remove the flatbreads from the frying pan when golden brown on both sides. It should take only 2-4 minutes to fry each batch of flatbread (so you need to watch the frying pan carefully… don’t step away from the pan or they will burn).
Add another 1 or 2 tablespoons of oil or butter to the frying pan when you fry a new batch of flatbreads.
Place the skillet flatbread on a wire cooling rack.
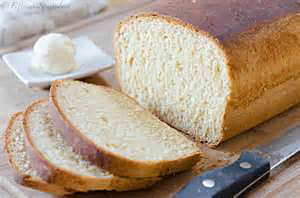
Yields 2 loaves
Amanda Paladini- Welcome Grove Homestead, shared by Jess Sowards – The Farmer’s Table
Ingredients
6 1/2 to 8 1/2 cups unbleached all-purpose flour
2 1/2 teaspoons salt
1 1/2 tablespoons instant yeast
2/4-3/4 cup sugar or honey
2 3/4 cups very warm water
1/4 cup neutral-flavored oil Directions
In the bowl of an electric stand mixer fitted with the dough hook (or in a large bowl, if making the dough by hand), combine THREE cups of the flour, salt, yeast and sugar.
Add the water and oil and mix.
Let the batter rest for 10 minutes. The yeast should be bubbly.
With the mixer running (or stirring by hand). gradually add another 3 to 4 cups of flour (I’ve had to add up to 5), until the dough comes together in a cohesive ball that clears the bottom and sides of the bowl.
Knead for about 2-4 minutes until the dough is smooth and supple.
Lightly grease a large bowl. Transfer the dough to the prepared bowl, cover with greased plastic wrap or a light kitchen towel, and let rise until doubled, about an hour or so, depending on the warmth of your kitchen.
Lightly punch down the dough and divide it into two equal pieces
Grease two 8 1/2-inch by 4 1/2-inch bread pans.
Press each piece of dough into a thick rectangle about 8-inches long; roll it up, pressing on the seams, and pinching the final seam together.
Place the dough loaves into the prepared pans.
Cover with lightly greased plastic wrap or thin kitchen towels and let rise until doubled and the dough has risen about 1-inch above the top rim of the pan, about an hour or so, depending on the warmth of your kitchen.
While the dough rises, preheat the oven to 350 degrees F.
Bake the bread for 30-32 minutes until golden and baked through.
Remove from the oven and turn the bread out onto a wire rack. Immediately brush the tops of the loaves with melted butter (or use a stick of butter, peeling the paper back and rubbing it on the top of the hot bread).
Let the bread cool completely.
The bread can be stored at room temperature, covered in a bread bag, for a couple days, or frozen for up to a month or so.
Ingredients
2 ½ C. All-Purpose Flour
2 Tablespoons Baking Powder
1 teaspoon salt
1 Tb sugar
Pinch of baking soda if using buttermilk to help even out ph
½ C. (1 Stick) Cold Butter, cubed and cold
1 C. + 2T. Cold Buttermilk (OR 1 C. + 1T. milk with 1T lemon juice or vinegar added.
2 T. Butter, melted, to pour or brush over top before baking
Directions
Preheat oven to 425°. Grease pan (I use a 12 inch cast iron pan)
Mix dry ingredients (flour, baking powder and salt) in medium mixing bowl.
Cut butter into dry mix until crumbly.
Mix buttermilk into crumbly mixture, mixing until incorporated.
Flour work surface and turn the dough out. Press until ¾ inch thick rectangle.
Fold the dough onto inself and press back to ¾ inch thick rectangle. Repeat this step again.
Cut into 3 inch biscuits with cutter or mason jar lid.
Notes Do not use hot melted butter. Melt the butter, then let it cool slightly, about 10 minutes. When added to the yeast mixture, it should be less than 105°F, or it could kill the yeast. I like to melt the butter first, then measure out all of my ingredients and bloom the yeast so it cools during that time. For a softer loaf: You can replace up to 1 cup of water with warm milk.
Sugar swap: You can use honey in place of the granulated sugar to feed the yeast.
To make 1 loaf: You can halve the recipe to make one loaf instead of two.
Cook Time30minutes minutes
Rise Time1hour hour 10minutes minutes
Servings2 loaves
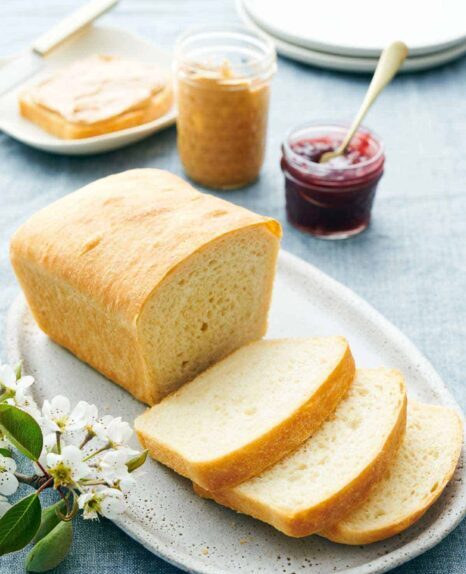
Author: John Kanell – Preppy Kitchen Equipment
2 9-inch loaf pans Ingredients
2 cups warm water (105 to 110°F) (480ml)
2 tablespoons granulated sugar
2 (0.25-ounce/7g) packets active dry yeast
6 cups all-purpose flour (720g)
4 tablespoons unsalted butter melted (56g)
2 teaspoons salt Instructions
In the bowl of a stand mixer fitted with the dough hook attachment, stir together the warm water, sugar, and yeast until combined. Let it stand for 5 minutes, or until very foamy.
To the same bowl with the yeast mixture, add the flour, butter and salt. Mix on low speed for 1 minute or until the dough comes together in a shaggy ball and pulls away from the sides of the bowl. (If any small bits of dough remain on the sides of the bowl, stop the mixer and scrape them into the dough ball.)
Increase the mixer speed to medium-low and continue to knead for 5 to 7 minutes, until the dough is smooth and springs back quickly when pressed with a finger. The dough should feel moist, but not sticky.
Place the dough in a lightly greased bowl. Flip the dough over once so that the top is also greased. Cover it with plastic wrap and let it rise in a warm, draft-free spot (75°F) for 40 to 50 minutes, until the dough is nearly doubled in size and springs back slowly when pressed with a wet fingertip.
Meanwhile, grease two 9×5-inch loaf pans with butter or baking spray.
Punch down the dough and turn it onto a very lightly floured surface. Divide it into 2 equal pieces (630g each).
Form each piece into an 8×12-inch rectangle. Starting with a short end, roll each piece into a tight, log shape. Pinch the seams along the sides tightly together and gently tuck them under the loaf. Use a bench scraper to pick up the loaves and place them seam side down into the prepared loaf pans. Loosely cover both pans with plastic wrap sprayed with nonstick spray and let them rise again for 25 to 35 minutes, or until the height of the dough rises just above the top rim of the pan.
While the dough is rising in the pans, preheat the oven to 350°F. Once the loaves have finished their second rise, brush the top of each loaf with additional melted butter if desired.
Bake for 30 – 35 minutes until the tops are golden brown. Let them cool for a few minutes in the pan, then tip them onto a wire cooling rack to cool completely.
Nutrition
Calories: 1635kcal | Carbohydrates: 301g | Protein: 42g | Fat: 27g | Saturated Fat: 15g | Polyunsaturated Fat: 2g | Monounsaturated Fat: 7g | Trans Fat: 1g | Cholesterol: 60mg | Sodium: 2352mg | Potassium: 476mg | Fiber: 12g | Sugar: 13g | Vitamin A: 700IU | Vitamin C: 0.02mg | Calcium: 74mg | Iron: 18mg
2 cups plain flour – sifted
1 Tb baking powder
½ tsp salt
½ tsp cream of tartar
1 ½ – Tb honey or sugar
1 stick butter (1/2 cup) cold and cut into ½ inch cubes. You can use shortening or a mix of butter and shortening.
⅔ – ½ cup whole milk Directions:
Preheat oven to 375 F. to 400 F. I use 375 F. for my oven.
You can use fork method or place dry ingredients in a food processor and whiz to combine.
Add butter and pulse or cut in with pastry cutter, till the butter looks pea size.
Dump into a mixing bowl if using processer, and add the milk and honey and stir until it comes together by hand.
Place on a lightly floured surface (I use a sheet of parchment paper for easy clean up). Knead several times to work the gluten then pat the dough with your fingers to about ¾ inch high. You can go lower and get more biscuits but they won’t be as high.
Gently cut out with a biscuit cutter, a tin can or a glass. Try not to use twisting or sawing motion as it will smash edges and affect the rise of the biscuit. Place biscuits in baking pan flat side up for a more even rising.
Let the biscuits rest a few minutes or up to ½ hr. before placing in the oven if you have time. The rise will increase.
You may brush the tops with melted butter or milk before baking but I always brush with butter right after they come out of the oven.
Don’t use an electric mixer, or you could over-mix the batter, resulting in a dense loaf or large holes in the crumb. Just use a spatula and mix until everything is just combined.
It is much easier to zest the orange before juicing.
Bring your eggs and milk to room temperature so they incorporate fully into the batter.
Measure your flour correctly! Adding too much flour will lead to the cranberry bread ending up dense. The best and easiest way to measure flour is by using a scale. If you don’t have one, then fluff your flour with a spoon, sprinkle it into your measuring cup, and use a knife to level it off.
For a smooth glaze, sift the powdered sugar before whisking it together.
If the top of the loaf is browning too quickly, cover the pan with some tin foil.
To get more juice out of an orange, roll it under your palm on the countertop to loosen the juices. Use 9×5 inch loaf pan
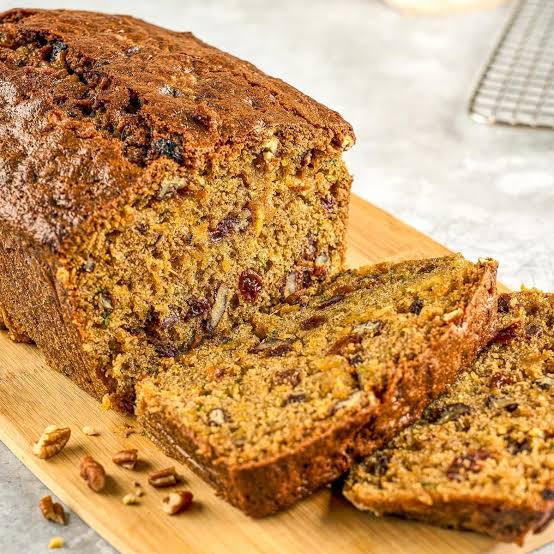
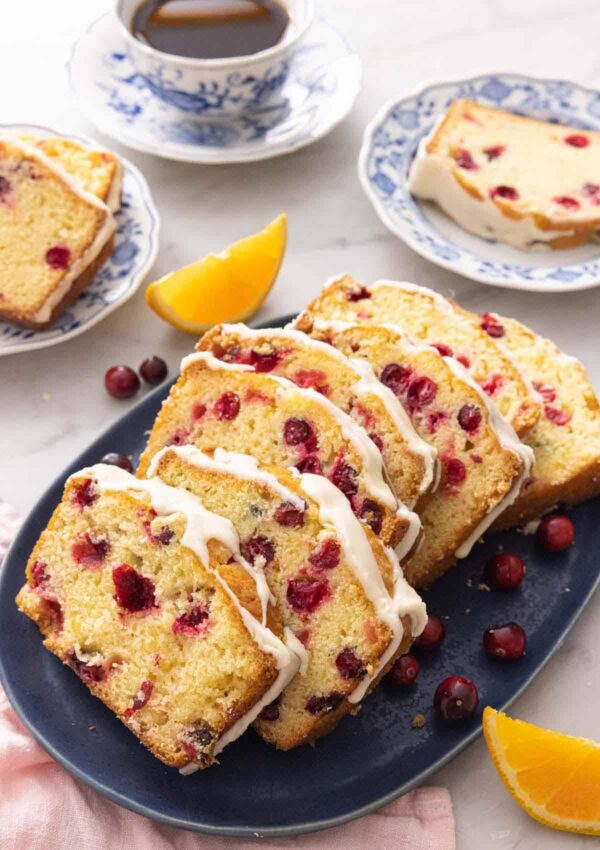
Cranberry Orange Bread
Servings 8 AuthorJohn Kanell
Ingredients
For the Cranberry-Orange Bread
2 cups all-purpose flour (240g)
1 cup granulated sugar (200g)
1¼ teaspoons baking powder
½ teaspoon salt
½ cup milk (120mL)
½ cup vegetable oil (120mL)
zest of 1 orange
2 tablespoons orange juice (about 1/2 orange)
1 large egg
2 teaspoons vanilla extract
1 cup fresh or frozen cranberries
For the Orange Glaze
1½ cups powdered sugar sifted
3 to 4 tablespoons orange juice
¼ teaspoon vanilla extract
orange zest Instructions
1. Preheat the oven to 350F. Butter a 9×5-inch loaf pan or spray with baking spray.
2. In a large mixing bowl, whisk together flour, sugar, baking powder, and salt. In another large bowl, whisk together milk, oil, orange zest and juice, egg, and vanilla until well combined.
3. Add the milk mixture to the flour mixture and stir just until combined. Fold in the cranberries. Pour the batter into the prepared pan.
4. Bake for 55 minutes, or until a toothpick inserted into the center comes out with a few moist crumbs. Let the bread cool in the pan on a wire rack for 20 minutes. Carefully remove and let cool completely on the wire rack.
For the Glaze:
1. In a small bowl, whisk together sugar, orange juice, and vanilla until smooth and desired consistency. Drizzle over the cooled bread. Garnish with orange zest before slicing, if desired.
1Cp tepid water
3 tsp yeast
3 TB Sugar
3TB oil
1½ tsp Salt
3 Cups Flour
Mix tepid water and yeast and let it proof.
Mix salt and flour in mixer very well.
Mix in the sugar and oil.
Mix in the yeast and water.
Mix for about 3 minutes or more before testing the texture.
Mix time will be a total of 7-10 minutes.
Only add water a tablespoon at a time if you feel it is too dry,
the same with flour if you feel dough is to wet. Mix for another
3 min. before you add anything more. If all looks good, mix for
another 7min. or less if you have had to add ingredients, or a
total of no more that 10 minutes all together.
Meanwhile boil water and place into a pan inside unheated oven when dough
is almost ready. For safty sake, please place you hot water pan in oven then add the
water.
Place dough in a greased bowl and cover with cotton towel or
cheese cloth. Place bowl in unheated oven on top rack, to rise.
About 1 hour should be enough for the first rise.
Empty out the water and put more water on to boil.
Form and fold dough into you well-greased bread pan.
Place the water into the pan again.
Place dough onto the top rack in the unheated oven to rise
Until it is about 2 knuckles higher than the pan. Takes about 20-30
minutes.
With the water still in the oven, preheat oven to 350 °.
Bake bread 30-40 minutes until bread reaches 198°-200°.
Check the bottom of the bread loaf to see if it is browned enough, if so
Turn it out on towel or rack and let cool.