
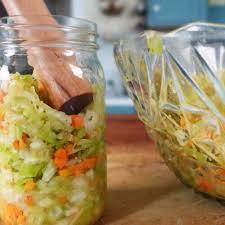
Don’t forget to save a couple leaves for top after second layer removed.
INGREDIENTS:
• 2.2 lbs green or purple cabbage (shred) (I use 1 head)
• 1 or (3/4 Tablespoon sea salt for 2-4 lbs cabbage) heaping tablespoon sea salt, kosher salt, Himalayan salt (not iodized table salt)
• 1-2 carrot (optional)
• 1-2 teaspoons caraway seeds (optional)
• additional fresh or dried herbs like caraway, ginger root, fennel or dill (optional)
Let set 20 to 30 min. then massage and press into jars.
2 weeks or more to ferment.
Ck ph before tasting
PH should be below 4.1 at least.
The ideal pH for a safe and well-preserved sauerkraut fermentation is at or below 4.6, though a lower pH of around 3.5 to 4.1 is even better for inhibiting harmful microbes and achieving the best flavor. This acidic environment is created by lactic acid bacteria as they consume cabbage sugars during fermentation, resulting in a tangy, safe product.
Why pH is Important
Safety:
A pH of 4.6 or lower prevents the growth of pathogenic bacteria, such as those causing botulism, which need a more neutral environment to multiply.
Flavor:
The lactic acid produced lowers the pH, contributing to the characteristic tangy flavor of sauerkraut.
Preservation:
The acidic environment acts as a natural preservative, making the sauerkraut safe to eat and store.
Achieving the Correct pH
Initial pH: The process begins with a relatively neutral pH, which gradually drops as lactic acid bacteria become active.
Lactic Acid Bacteria (LAB): These beneficial bacteria consume sugars in the cabbage to produce lactic acid, lowering the pH.
Fermentation Time:
Fermenting for at least 7 days allows the pH to fall to a safe level. Fermenting longer can lead to a lower, safer pH of 4.1 or below, which further enhances preservation.
Category: Uncategorized
Surprisingly Good Garlic Bread

This is a recipe that I picked up in El Centro, it is surprisingly good. Sounds weird, but tastes great! Try it at least.
I like mixing all the ingredients together before spreading it on the bread. I like doing it this way as I can control the flavors better.
If you want really crunchy garlic bread; spread slices on a cookie sheet and toast one side till just golden. Remove from oven and let cool. Spread the mayo mixture onto the UNTOASTED side, sprinkle with cheese and slide back into the broiler until bubbly and toasted.
1 loaf French or sourdough bread (sliced or unsliced)
½ C Mayo
2-3 Tb minced fresh parsley or 1Tb dried
Garlic powder to taste
Crushed black pepper to taste
Parmesan cheese to taste
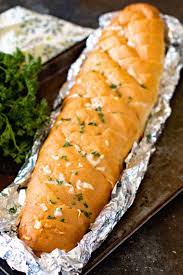 Slice good French or Italian bread in individual pieces. Mix the ingredients together in a bowl and spread on the bread. Sprinkle on a little parmesan cheese if you like, it’s really tasty on this bread. The original recipe calls for the pieces to be re-assembled untoasted into a loaf, wrapped in foil and baked until hot. I still like mine to be broiler toasted. I lay the pieces out with mayo side up on a foil lined broiler pan and broil until toasty. This is one time you better “watch the pot boil” as the saying goes, as this will cook fast. Enjoy