Fermented pickles

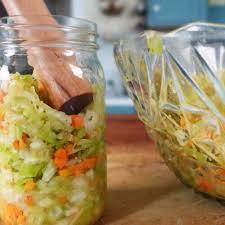
Small cucumbers make crispier pickles – LESS WATER CONTENT IS BEST.

https://www.youtube.com/watch?v=GX6PPYRPPa0

Place 2-3 Grape leaves on top of pickles to help make pickles crispier because of the tannins.

Hot Soapy water and rinse well is all you need for jars.

Basics:

Brine:  Sea Salt (no caking agent)
Distilled Water
2 Tb Salt to 1 Qt Water
Cut off Blossom end and quarter Cucumbers

  • Pickle Seasoning: 1 to 2 tablespoons of a pre-mixed pickling spice blend per quart jar.
  • Optional Add-ins for Crunch: 1-2 grape leaves, oak leaves, bay leaves for crunch, or a pinch of black tea leaves can add tannins to help keep pickles crisp.
  • Other Flavorings: Fresh garlic cloves and dill sprigs are common additions. 

Pack spears tight
If you have dill flowers use it liberally.
Cover with brine
Add  a few grape leaves, weight  so pickles stay under liquid.

7-8 days to ferment
PH Below 4.5
Refrig after ready

Kham Yeast
Yeast is a harmless white layer of mold. Lift carefully and discard. A small amount of black mold (not harmless) can be carefully scraped off, then flush with a new brine  (see video.)

https://cleanfoodliving.net/fermented-pickles/

Recipe:
Cucumbers (enough to fill the jar) (Small pickling cucumbers are best)
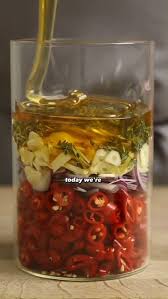
1¼ tsp Coriander Seeds (whole)
5-10 Cloves
2 cloves Garlic (sliced)
handful Dill Flowers or Fresh Dill Weed (sub with dill seeds if you don’t have fresh dill available.)NOTE: If using dill seeds instead of fresh, add all the seeds to the bottom of the jar.
5 Bay Leaves
1 tbsp Fine Salt (use a salt that not contain anti-caking agents.)
1 quart distilled water
Brine Note
In the video I use a 4.25% brine. However the saltwater brine concentration in this recipe has been reduced to a 3% due to popular request. Use a salt that does not contain anti-caking agents since they can cause a fermentation to fail.
Brine Instructions
Combine the salt & water and mix thoroughly. Set aside for later use.
Jar Instructions
Wash the jar(s) being used in hot soapy water. Sterilization is not required.
Cucumber Notes
Official pickling cucumbers work best, however any variety can be used.
If the cucumbers have dirt on them then lightly rinse it off. If they are not dirty, do not rinse. The beneficial bacteria needed for the fermentation to take place are naturally present on the surface of the vegetable skin. If washed with produce soap or power rinsed, those good bacteria will go down the drain. Garden or farmer’s market cucumbers work best. Store bought cucumbers, even organic, are power washed before they are placed on the store shelf. Since most (if not all) of the beneficial bacteria have been washed away, most likely the fermentation will fail.

Garden or famer’s market cucs have not been washed which is why they will successfully ferment.

TIP: If buying the cucumbers from a farmer’s market, ask the farmer if they have been washed beforehand. 99% of the time they say no, but it doesn’t hurt to confirm!

Ingredient Instructions

Add the coriander seeds, cloves, some of the fresh dill and garlic slices to the bottom of the jar.

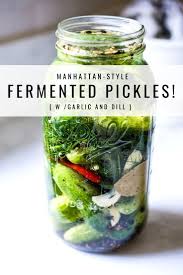
Fill the vessel tightly with the cucumbers whether they be in the form of slices, spears or whole. (Whole cucumbers will retain their firmness better than slices or spears)

Add the bay leaves, garlic slices and some more dill between the cucumbers as you load the vessel.

TIP: The bay leaves contain tannins which help retain the firmness of the cucumber during fermentation. Add more bay leaves for more tannins if you desire. The taste of the fermented pickle will not be adversely affected.

Top off the jar with any remaining dill, but leave a 2-3 inch (5cm) headspace so that there is room for the weight.

Add the fermenting weight.

Even though the cucumbers seem tightly packed in the jar for now, come days 2 and 3 they will begin to loosen and float up. Therefore, it is imperative to use a fermentation weight. Don’t skip it!

Pour the brine over the cucumbers and weight until everything is fully submerged beneath the brine. The brine will protect the food from mold and other bad pathogens.

Place a loose lid on the jar. If the lid is kept loose, the fermentation gasses will be able to escape without needing to burp the jar.

Leave on the counter out of direct sunlight for 5 to 8 days for the fermentation period.

TIP: A longer fermentation period will contribute to the cucumber’s loss of firmness which is why I don’t recommend longer than 8 days.

Feel free to taste test the cucumbers daily beginning on day 5 of the fermentation period. End the fermentation when their texture & flavor taste good to you. This can be on day 5, 6, 7 or 8.
End The Fermentation
Once the fermentation period is over, with clean hands take out the fermenting weight.

Remove any kahm yeast that may have developed. Watch the video to see how to do this because I provide a visual demonstration.

Note: Although kahm yeast is unattractive atop a fermentation, it is harmless.

Storage
For long term storage, there is no need to return the weight to the jar. Secure the lid on the jar tightly and keep the pickles in the refrigerator where they will last for many months.

NOTE: Fermentations require cold storage to last long term. In the olden days root cellars were used, but most people do not have these in modern times. That is why a refrigerator is needed.

If making a quantity larger than a quart/liter jar, see instructions below on how to adjust the ingredient measurements.

Tannins help fermenting cucumbers remain firm.  Tannins can be found naturally present in bay leaves, grape leaves, oak leaves and black & green tea.  I have found 5+ bay leaves or 4-5 grape leaves per quart/liter to be quite effective.  Black & green tea changes the flavor of the pickles and in my opinion, does not work as well as the bay & grape leaves.  I have not personally experimented with oak leaves, but have heard some people swear by them.


Published
Categorized as Fermenting

Fermented Cinnamon Apples

3-4 organic apples (sweet)
1 tsp Himalayan salt
2 Tbsp cinnamon
4-6 whole cloves
Juice of 1 lemon

  • Optional Culture Starter: 1-2 tablespoons of whey, kombucha, or brine from another successful ferment (helps kickstart fermentation, but not essential). 

Filtered or well water

Instructions
  1. Prepare the Brine: In a bowl or separate jar, whisk the salt, lemon juice, and optional starter culture with about ½ cup of the water until the salt is fully dissolved.
  2. Pack the Jar: Pack the apple chunks and the cinnamon stick(s) into the clean quart jar. Pack them firmly but without mashing.
  3. Add Liquid: Pour the brine mixture over the apples. Then, add enough additional filtered water to completely cover the apples, leaving about 1 inch of headspace at the top of the jar for expansion.
  4. Submerge Apples: Place the fermentation weight on top of the apples to ensure all solids remain submerged under the brine. This is crucial for preventing mold.
  5. Seal the Jar: Secure an airlock lid or standard lid onto the jar. If using a standard lid, slightly unscrew it once or twice daily to release excess gas (“burp”). Place the jar on the kitchen counter, out of direct sunlight, perhaps on a plate to catch any potential overflow.
  6. Ferment: Allow the apples to ferment at room temperature for 2 to 5 days. Fruit ferments quickly due to its high sugar content, so check them daily. You should see bubbles forming in the brine and the mixture will smell slightly alcoholic or tangy.
  7. Store: Once the apples are fermented to your liking, remove the weight and replace the lid with an airtight one. Store the fermented apples in the refrigerator for up to 2 months. 
The finished fermented apples are great over yogurt, oatmeal, or simply as a crunchy, healthy snack. 
Published
Categorized as Fermenting

Fermented Onions

https://cleanfoodliving.net/fermented-onions/

Servings: 1 Quart/Liter

Ingredients

  • Onions (as many needed to fill the jar) sliced
  • handful Fresh Herbs Suggestions: Tarragon, Thyme, Dill & Rosemary
  • 1 tbsp Salt Pure salt without anticaking agents
  • 1.5 c WaterInstructionsBrine Instructions
    1. Combine the water & salt and mix thoroughly. Set aside.

    Onion & Herb Instructions

    1. Slice the onion(s). The Herbs can remain whole and on the stem.
    2. Place the onions and herbs in a mixing bowl.
    3. Pour the brine over the ingredients and toss to coat everything with the brine.
    4. Allow the onions and herbs to rest in the brine for 1 to 2 hours. Toss with clean hands to refresh the brine coating every 30 minutes.

    Load the Jar

    1. First, clean the jar, weight and lid by washing them in hot soapy water.
    2. Scoop 1-2 handfuls of the onion and herb mixture into the jar.
    3. Press the mixture down with a tart tamper, wooden dowel or other type of mallet.
    4. Add 1-2 scoops of the brine, no measurement needed.
    5. Repeat these steps until the jar is full.
    6. Press down with the mallet one last time before adding the weight.
    7. Set the jar on a dish to catch any possible brine overflow as you add the fermenting weight and push it down as much as you can. The brine level should be near the top of the jar and everything submerged beneath it.
    8. Place a loose lid on the jar. So long as the lid is loose, the fermenting gasses will be able to escape and you will not need to burp the jar.

    Fermentation Period

    1. Place the jar(s) on the countertop at room temperature for 10 to 21 days. Keep the jar of the fermenting onions on a towel or dish to catch any possible brine overflow.

    What To Expect

    1. Colors:will change from vibrant to muted tones.

    Bubbles: Carbon dioxide bubbles will form during the 1st week of fermentation, then die off during week 2 and 3.

    Smell: A healthy fermentation should have a light soury-sweet smell. If the fermentation smells offensive or rotten, throw it away.

    Kahm Yeast: When fermenting foods that contain a lot of natural sugars like onions, kahm yeast will most likely develop on the surface. Although unattractive, it is harmless.

    Watch my Kahm Yeast video on YouTube or read my Kahm Yeast Article at CleanFoodLiving.net where I do a deep dive into the topic along with visual examples.

    End the Fermentation

    1. When you decide to end the fermentation period (a minimum of 10 days up to 21 days) is based on your taste preference. The longer the onions ferment, the more their flavors will develop and their texture will soften.
    2. Open the jar and take a look. Most likely you’ll see a layer of kahm yeast on top. This is okay.

    With clean hands, reach in through the kahm yeast and remove the fermenting weight. Use a paper towel as a gripper if the weight is too slick.

    1. Remove any remaining kahm yeast. The good news is that the fermenting weight will take the bulk of the kahm yeast out with it.

    Next, use a paper towel to wipe off the remaining kahm yeast from the inside of the jar. You can also dab the surface with a paper towel (or use a spoon) to pick up remaining kahm yeast flakes.

    Remember that kahm yeast is harmless so if some pieces remain, it’s ok!

    *Demonstration of how to do this is provided in the video.

    1. To store long term, keep the weight out of the jar and put the lid back on tightly.
    2. Place the fermented onions in the refrigerator where they will last for many months.


Published
Categorized as Fermenting

Apple Cider Vinegar

https://www.youtube.com/watch?v=jJVQuec2fTs

Very Good:  https://cleanfoodliving.net/how-to-make-apple-cider-vinegar/


Making your own apple cider vinegar (ACV) at home is a simple, two-stage fermentation process using apple scraps, sugar, and water. The entire process takes approximately 5 to 8 weeks.

Ingredients & Supplies

  • Apple scraps: Cores and peels from approximately 6 large, fresh, pesticide-free apples (enough to fill a 1-quart jar about 3/4 full). Avoid using moldy or rotten pieces.
  • Water: 2-3 cups of non-chlorinated water (chlorine can interfere with fermentation).
  • Sugar: 2-4 tablespoons of granulated cane sugar or honey (this feeds the bacteria and yeast).Per quart.
  • Jar: A clean glass jar (quart size is standard).
  • Cover: A breathable cover such as a coffee filter, paper towel, or tight-weave cloth, secured with a rubber band or a jar ring (this allows air in while keeping pests out).
  • Optional: A splash of raw, unfiltered store-bought ACV with “mother” to help kick-start the process.

Instructions

First Fermentation (Alcoholic)

  1. Combine apple scraps, dissolved sugar in non-chlorinated water, and optional ACV “mother” in a jar, leaving headspace.
  2. Cover the jar with a breathable cloth and secure it.
  3. Store in a dark room-temperature place (65-80°F) for 2-3 weeks, stirring every few days. You should observe bubbling and a slightly alcoholic smell.

Second Fermentation (Acetic Acid)

  1. Strain the liquid into a clean jar after the initial fermentation, discarding the apple solids.
  2. Cover the jar with the breathable cloth again. Oxygen is needed for the bacteria to convert alcohol to acetic acid.
  3. Continue fermenting in a dark place for another 3-6 weeks or longer. A “mother of vinegar” may form.
  4. Taste periodically with a clean straw. When it has a sharp, tangy taste, it’s ready. (See PH test below)

Storage

Once the desired acidity is reached, remove any “mother,” transfer the ACV to an airtight bottle, and store in a cool, dark place. Refrigeration with a sealed lid can halt the fermentation.

he pH of homemade apple cider vinegar typically ranges from 2 to 3, but can be higher (up to 4.5) depending on the fermentation success. An ideal pH is between 3.0 and 3.5. If the pH is above 4.5, it’s considered unsafe due to a failed fermentation process.

Ideal pH for homemade ACV

  • pH 2.0–3.0: This is the ideal range for most homemade apple cider vinegar, indicating a strong fermentation and safe acidity.
  • pH 3.0–3.5: This is a very good and safe range, indicating a successful and acidic product.
  • pH 4.0–4.5: While some sources say a pH of 4.2 is considered safe, a reading above 4.5 indicates the fermentation may not be complete, and it should not be consumed.

How to measure the pH

  • Use a pH test kit: Use pH strips or a digital pH meter for the most accurate reading.
  • Test the pH: Take a reading to ensure the vinegar is acidic enough for preservation and is safe to consume.
  • Avoid tasting or smelling: Relying on taste or smell is not a precise way to determine the acidity of vinegar.

What to do if pH is too high

  • If the pH is above 4.5: The fermentation was not successful and the mixture is not safe to consume. You can try again, making sure to use appropriate starter materials and maintaining the right conditions for fermentation.
  • If the pH is in the 3.0 to 4.0 range: You can either consume it cautiously or let it continue to ferment to reach a lower pH level. Adding a little more sugar and letting it continue to ferment may help it reach the desired lower pH.


Published
Categorized as Fermenting

Make your own sourdough starter the old way

Use only distilled water.
Flour must be unbleached
Yogurt, with active cultures or buttermilk

5-6 TB yogurt
A little water till consistency of cream

Pinch of caraway seed – helps with fermenting

Stir

Add flour (rye is best for fermenting) whole wheat is also good (½ rye ½ whole wheat is great a small sprinkle of rye or whole wheat spelt)

Use enough flour mix a bit at a time till consistency of a thick pancake batter.

Loose lid on top – place in warm place (at least 70 degrees) – stir every couple days.-for about a week.

Brownish water on top (called hooch) and mix in to starter real well, if starter too thin, add a tad of flour till it is the heavy pancake thickness again.

Every day Stir starter, ck to see if it needs more water or flour.

Day 4 should smell yeasty and sourdough-ish.

Day 5 mild yeasty smell and ready.

Stir in enough flour at end of starter ferment for storage, to make batter super dry and stir it really good. When dry as possible pour at least a ½ ot 1 c. flour on top, seal type lid on top, and store in frig.  Use once or twice a month if possible.
Why Did my Starter Grow Mold?

Sterilize everything well before starting
Mold in air
Mold in wheat flour

Using Starter and bread making.

Add water and work it into the mixture until thick pancake batter consistency again.
Leave overnight
For 1 loaf round Bread
1C Milk
2Tb Butter
1 ½ Tsps. salt
2 Tb honey
3 ½ cups flour
1 Cup Sourdough starter
You may need to add 2-3 Tb of water depending on the type of flour that you use.
2 rise periods
Scar bread with razor blade
Bake at 400 degrees for about 40 min.

Sauerkraut

Don’t forget to save a couple leaves for top after second layer removed.
INGREDIENTS:
• 2.2 lbs green or purple cabbage (shred) (I use 1 head)
• 1 or (3/4 Tablespoon sea salt for 2-4 lbs cabbage) heaping tablespoon sea salt, kosher salt, Himalayan salt (not iodized table salt)
• 1-2 carrot (optional)
• 1-2 teaspoons caraway seeds (optional)
• additional fresh or dried herbs like caraway, ginger root, fennel or dill (optional)
Let set 20 to 30 min. then massage and press into jars.
2 weeks or more to ferment.
Ck ph before tasting
PH should be below 4.1 at least.
The ideal pH for a safe and well-preserved sauerkraut fermentation is at or below 4.6, though a lower pH of around 3.5 to 4.1 is even better for inhibiting harmful microbes and achieving the best flavor. This acidic environment is created by lactic acid bacteria as they consume cabbage sugars during fermentation, resulting in a tangy, safe product.
Why pH is Important
Safety:
A pH of 4.6 or lower prevents the growth of pathogenic bacteria, such as those causing botulism, which need a more neutral environment to multiply.
Flavor:
The lactic acid produced lowers the pH, contributing to the characteristic tangy flavor of sauerkraut.
Preservation:
The acidic environment acts as a natural preservative, making the sauerkraut safe to eat and store.
Achieving the Correct pH
Initial pH: The process begins with a relatively neutral pH, which gradually drops as lactic acid bacteria become active.
Lactic Acid Bacteria (LAB): These beneficial bacteria consume sugars in the cabbage to produce lactic acid, lowering the pH.
Fermentation Time:
Fermenting for at least 7 days allows the pH to fall to a safe level. Fermenting longer can lead to a lower, safer pH of 4.1 or below, which further enhances preservation.

Fermented Hot Honey

The Farmer’s Table: 

Ingredients

¾ cup peeled garlic cloves, sliced thin

¼ cup finely diced onion (about half a medium onion)

3-4 spicy chili peppers, sliced thin

Optional 2 small sweet peppers, sliced thin

6 sprigs of thyme, leaves stripped from stems (good for sweet and savory dishes). Optional: rosemary, Oregano, Basel or Italian seasoning.

1 ½ C honey. 

Use a Tablespoon of  vinegar as well if worried about botulism.

Directions

Combine all ingredients in a pint jar and top with honey, stirring that it can reach all crevices.
Cover with a fermentation lid or a cloth secured with a rubber band. 

Leave on counter for one week, stirring or shaking daily.
Seal with a solid lid and store in the fridge.

Published
Categorized as Fermenting