My Apricot Chicken

Apricot sauce:
Chicken:
2 lbs chicken thighs, chicken tenderloins strips
or chicken breasts bone in, skin on.
½ cup plain flour to dredge chicken
salt and pepper (to taste)
1 tablespoon vegetable oil

Heat 1-2 Tb oil in a skillet.
Dredge chicken in flour, sprinkle on salt and pepper. Cook until chicken is lightly browned. 15-20 min.
Drain and make sauce.

Sauce:
½ to 2/3 cup fresh apricots, sliced in half. If using dried apricots either reconstitute or slice small and let them swell in the sauce.
Orange juice for liquid: 3-4 cups
¼ cup soy sauce* low sodium
2 tablespoons Dijon mustard (optional)
1 – 2 cup apricot preserves
½ sliced onion
1 teaspoons kosher salt
2 teaspoons granulated garlic
just a small pinch of teaspoon crushed red pepper
Instructions:
Sauté onion slice in pan used to cook chicken. If needed add a little orange juice to deglaze pan and sauté the onions.
After about 4 min. turn onions, and add the apricots and sauté them. Again if needed add a tablespoon or so of orange juice to the pan. When onions are sautéed add other ingredients, including the chicken.
Cook until sauce and chicken is simmering for 15-20 min.
Add a cup or2 of orange juice as the thermal pot needs to be 3/5 full.
Pour into thermal pot, and clamp down lid.

Chicken & Sweet corn Soup

Serves 4

1 Tbsp. oil
1 litre Chicken Stock
2 420gm can creamed corn
1 onion, diced
500gm chicken, diced
1-2 carrots, diced
4 sticks celery, chopped
1 cup water
Optional: add 1 stock cube for extra flavour

Method:
Place the inner pot of the thermal cooker on your stovetop. Heal oil & brown chicken & onion. Add stock, creamed corn, corn kernels, carrot, celery & water over medium-high heat. Cover bring to the boil & simmer for 15 mins.
Place lid on the large inner pot, turn off the burner, and put inner pot into the outer pot of the thermal cooker. Close the lid on the outer pot and let sit before serving.

You can use slow cooker recipes in your thermal cooker

Food Prep guide:
You can use slow cooker recipes in your thermal cooker, just bring all the ingredients to a boil at the start. Like a slow cooker, the amount of liquid that goes into the pot at the beginning will be retained, so adjust traditional recipes accordingly. Read more on using a thermal cooker.
Yes, you can absolutely use slow cooker recipes in your Stanley vacuum cooker (often called a thermal cooker or Camp Crock), but you cannot use them exactly like a standard electric slow cooker.
Because a Stanley uses vacuum insulation rather than a plug-in heating element to continuously cook, you have to adapt your method:
1. The Prep
You still prepare your ingredients (stews, soups, curries, or braised meats) in your standard slow cooker recipe. However, instead of immediately dumping everything into the Stanley, you must heat the food to a rolling boil on a stove first.
• If cooking raw meats: Boil the food on the stove for at least 15 to 30 minutes so it has enough thermal energy to finish cooking.
• If using pre-cooked or no-meat recipes: Boiling for 3 to 5 minutes is generally sufficient.
2. The Cook
Immediately transfer the boiling pot of food directly into the Stanley vacuum cooker and clamp the lid shut. The vacuum insulation will retain the heat, allowing the food to slowly continue “cooking” without any power or electricity.
• Because it slowly loses residual heat, your food needs to sit in the vacuum cooker for at least 6 to 8 hours to tenderize meats properly
3. Key Rules for Success
• Fill it up: Thermal cookers rely on mass to retain heat. Your inner pot should be at least 2/3 full.
• No peeking: Do not open the lid during the process. Every time you open it, you let out the heat needed to safely cook the food.
• Liquid levels: Use a little more liquid or stock to ensure the food stays submerged, as there will be no evaporation.
For tips on how to prepare your thermal cooker meals to be hot, ready, and safe to eat out in the field:

Orange Chicken In a Thermal Cooker

The main principle for success with the thermal cooker is that everything goes into the cooker at once, and all of it needs to be boiling hot. We made Asian Orange Chicken, and since rice, small pieces of chicken, and sauce only take a few minutes to get that way, this is a super quick recipe. In the video, we doubled the recipe, so be aware of that when you look at these quantities and then watch the video. We have the original recipe below, but you can use your favorite. (Be aware that breading isn’t ideal in the cooker; that’s why I left the flour out.)

Here’s the recipe for 4-5 servings: (the cooker needs at least this much mass inside to keep it cooking)
2 boneless, skinless chicken breasts, cut into 1 inch pieces
1/4 teaspoon salt
dash pepper
3 Tablespoons olive oil
1 1/2 cups water
3 Tablespoons orange juice
1/3 cup lemon juice
3 Tablespoons rice vinegar
2 1/2 tablespoons soy sauce
1 Tablespoon grated orange zest
1/2 cup packed brown sugar
1/2 teaspoon minced fresh ginger root
1 teaspoon minced garlic
2 Tablespoons chopped green onion
1/4 teaspoon red pepper flakes
3 Tablespoons cornstarch
2 Tablespoons water

Arroz Con Pollo

Chicken

  • 2-3 tbl Olive oil
  • 2-3 chicken breasts cut up
  • ¼ c flour for dredging
  • Salt, pepper, paprika

Rice

          • 2 tbl olive oil
          • 1 med. onion, chopped
          • 1 clove garlic, minced
          • 1 c rice
          • 2 c chicken stock
          • 1 heaping tbl.tomato paste or 1 c diced tomatoes (strained)
          • Lg Pinch of Oregano
          • lg Pinch of Cumin
          • 1 tsp salt

      Directions:

      1. Heat olive oil in large pot. Combine flour, salt,

      pepper & paprika in wide bowl. Dredge chicken

      pieces lightly in flour mix and brown in pan. Cook

      pieces on each side and remove when done.

      1. Add rice to the pan to brown, adding more oil if

      needed. Stir first to coat rice with oil, then don’t

      stir much. Let brown then add onion & garlic and

      cook mix stirring frequently until onions have

      softened, about 4 minutes.

      1. Place chicken on top of rice. In separate bowl mix

      together stock, tomato, salt & oregano, and pour

      over chicken & rice. Bring to a boil for 2-4 mins and

      place in cooker.

Mexican Chicken Delight

(from Saratoga Jacks website)

2-3 lbs boneless chicken breast, chopped in chunks and put into large pot. Turn on high.

Then add:

Large (32oz) jar of chunky, medium salsa

1 can chunky pineapple, drained

1 can corn, drained

1 can black beans, drained & rinsed

Bring to a boil for at least 2 mins while stirring. Make

rice (3 min. boil) in smaller pot. Put into cooker for at

least 2 hours. Serve with sliced avocado and cilantro sprinkles

Cook for at least 2 hours

Stanley Thermal pots recipes

Stanley thermal pots and food jars are excellent for off-grid cooking and keeping meals hot for hours. To cook, simply preheat the insulated jar with boiling water for 5 minutes, then add your raw or parboiled ingredients, top with fresh boiling water, and let it steep using trapped residual heat

Try these simple, travel-friendly recipes in your Stanley:

  1. Overnight Steel-Cut Oats
  • Ingredients: ½  cup steel-cut oats, 1 ½  cups liquid (water, almond milk, or dairy milk), 1 tbsp coconut oil or butter, sweetener (maple syrup/honey), and a pinch of salt.
  • Directions: Boil the liquid, oil, and salt in a saucepan. Add the oats and boil for 2-3 minutes. Transfer the entire mixture into your preheated thermal pot. Seal it overnight (up to 10 hours) and enjoy a warm breakfast in the morning.
  1. Quick Backpacking Rice & Beans
  • Ingredients: ½ cup instant rice, ¼  cup quick-cook dehydrated beans, 1 tbsp taco seasoning, and 1.5 cups water.
  • Directions: Boil the water in a camp pot and stir in the ingredients. Boil for 1-2 minutes, then pour the hot mixture into your preheated Stanley. Seal tightly and let it cook for 30–40 minutes before eating.
  1. Thermal Pot Quinoa
  • Ingredients: ½  cup rinsed quinoa, 1 cup water, and ¼  tsp salt.
  • Directions: Bring the water and quinoa to a rolling boil in a pot. Boil for 2-3 minutes. Transfer to your preheated Stanley and seal it for 20 minutes to yield perfectly fluffy quinoa without watching a stove.
  1. Ramen & Vegetable Soup
  • Ingredients: 1 block of instant ramen noodles (discard the heavy seasoning packet), ¼  cup dehydrated mixed vegetables, 1 tbsp bouillon powder, and 1.5 cups water.
  • Directions: Boil the water and pour it over the noodles, veggies, and bouillon directly into the thermal pot. Seal it tightly. The noodles and vegetables will rehydrate and cook perfectly in 10-15 minutes.

Split Pea Soup (thermal pot)

Ingredients

  • 9 Cups broth (vegetable or chicken or stock from ham hock)
  • 3 Cups dried green split peas (rinse well first)
  • 1 large chopped onion
  • 2 C chopped carrots
  • 4 chopped celery stalks
  • 1/2 Tbsp minced garlic
  • 1 tsp dried basil
  • 1/2 tsp dried cumin
  • 1 tsp salt
  • 1/2 tsp black pepper
  • 3 C small chopped new red potatoes with skins on

Instructions

Bring all ingredients to a 3 minute rolling boil . seal unit and cook for 3-8 hours. fodd needs to be at least 140 degrees for safety reasons especially i meat is included. When ready to serve, whisk soup to mix in split peas, or run a wand blender for a couple of bursts for a more uniform texture.


Thermal Cooker Step By Step Cooking Process

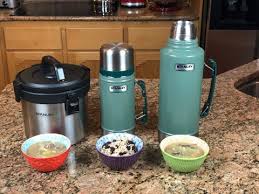
The Step-by-Step Cooking Process
1. Preheat the Thermos: Fill your Stanley thermos completely with boiling water, put the lid on, and let it sit for 5-10 minutes. This heats up the inner stainless steel walls so your food’s heat goes into cooking rather than warming the bottle.
2. Prepare Your Ingredients: While the bottle is preheating, gather your dry/fresh ingredients and make sure you have enough boiling water on hand.
3. Empty and Fill: Pour out the preheat water. Add your food (e.g., rice, noodles, and lentils) into the jar.
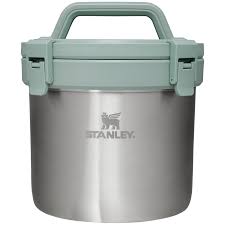
4. Add Boiling Liquid: Pour fresh boiling water over the ingredients. Ensure the ratio has enough liquid to cook and soften your specific food type. Fill your 3-quart Stanley thermal container (typically the Adventure Stay Hot Camp Crock) up to the bottom of the inner fill line, leaving about 2 to 3 inches of space from the top. Overfilling it beyond this point can cause the lid’s pressure release valve to fail, leading to leaks, spills, and scalding.

Maximizing Performance and Safety
To get the most out of your 3-quart Stanley container, follow these simple steps to prep the container and pack it safely:

  1. Preheat or Pre-chill

For maximum heat or cold retention, prime your container before filling.

        • Hot foods: Pour boiling water into the crock and let it sit with the lid on for 5 to 10 minutes, then pour the water out before adding your piping hot food.
        • Cold foods: Fill it with ice-cold water or crushed ice for a few minutes before adding your chilled items.
        • Filling Guidelines: Leave adequate “headspace” at the top, at least 3 inches.  Filling the container to the brim doesn’t leave enough room for a proper vacuum seal and restricts the venting capability of the lid. This space is especially crucial for hot soups, stews, or chilis.

      Seal and Cook:

      • Safety Precautions
      • Pressure: The container’s vented lid acts as a safety release valve in case of over-pressure. Never tamper with or remove this valve.
      • Carrying: Always ensure all latches are fully locked and secured before carrying.
      • Opening: When opening the crock, point the lid away from your face to avoid escaping steam, and lift the lid’s tabs to break the initial suction.
      • Restrictions: Do not use with dry ice, carbonated beverages, fermenting foods, or dairy products, as these can cause dangerous pressure buildup inside the vacuum seal.
      • Heat Sources: Never place the Stanley container directly onto a stove or other external heat source. 

Popular Recipes & Ratios
Instant Meals (Ramen, Couscous, Oatmeal): Combine 1part grains/noodles with 5 parts boiling water. Cook time: 5-10 minutes.
Steel-Cut Oats: Combine 1/2 cup steel-cut oats, 1 cup boiling water, and a pinch of salt. Cook time: 1 hour (or let sit overnight for a hot breakfast).
Rice: Combine 1/2 cup rinsed white rice (parboiled or quick-cook works best) with 1 cup boiling water. Cook time: 45-60 minutes.
Dried Beans/Lentils: Pre-boil the beans on a stove for 10 minutes first to soften the outer shell. Drain, place in the thermos, and add freshly boiling water. Cook time: 6-10 hours.
Key Tips for Success
Fill it Up: Thermal cooking works best when the thermos is at least 2/3 to 3/4 full to maintain heat.
Food Safety: Always ensure your food reaches an internal temperature above 140 degrees, to prevent bacterial growth, especially when cooking raw ingredients like pre-boiled beans or meats.
• Avoid Peeking: Try not to open the lid until you are ready to eat, as letting the steam escape stops the cooking process.