
Ingredients
- 2 cups pre-cooked cornmeal arepa flour (such as P.A.N. or Donarepa)
- 1 teaspoon salt
- 2.5 cups warm water (or more as needed)
- Oil or butter for cooking as needed
Instructions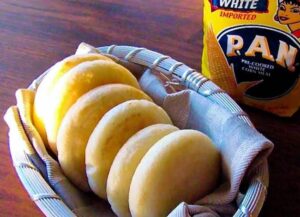
-
Combine the arepa flour, salt and water together in a mixing bowl. Mix well and let rest for 5 minutes.
-
Mix the dough again until smooth. It should have the consistency of playdough and not stick to your hands. If it is too dry, add a tablespoon of water and mix until smooth.
-
Hand form the arepas dough into 8-10 small patties, about 4-5 inches across and ½ inch thick.
-
Heat a grill pan or cast iron pan to medium heat and lightly oil or butter. Cook the arepas until golden brown on each side, about 10 minutes total. The outer shell will harden and form a crisp crust, with a softer or hollow interior. (NOTE: You can also pan cook them until crispy on the outside, then finish them in your oven or air fryer at 350 degrees F/177C for 8-10 minutes).
-
Cool slightly and serve as desired.
Arepa Flour Substitute
If you can’t find pre-cooked corn flour, this homemade blend works in a pinch, though the flavor and texture will be a little different. Thanks, Jérémie!
- 1 1/2 cups masa harina
- 1/4 cup coconut flour or almond flour
- 1/4 cup gluten-free flour or arrowroot starch
- 1 teaspoon baking powder
Serving Arepas
These wonderful corn bread cakes are incredibly versatile and can be served as a simple snack, as a supporting player to any meal, or even as the star. They’re great for breakfast, lunch, or dinner. Here are some serving ideas.
- Snack. Serve with butter or cream to be enjoyed on their own.
- Top Them. Use them as a base and top them with your favorite meats like shredded pork, chicken or cooked chorizo along with shredded or crumbled cheeses, guacamole, chopped tomatoes or other vegetables and more.
- Arepas con Queso. Thicker arepas can be stuffed with cheese, like mozzarella cheese, cream cheese or goat cheese for this famous version.
- Other Stuffings. You can also stuff them with meats or a combination of meats and cheeses. Consider stuffing them with ground or chopped beef, pork, ham, chicken, seafood, black beans or vegetables.
- Breakfast. Replace your morning toast with arepas. They’re great as they are with a bit of butter, or topped with fried eggs.
- On the Side. Serve them to accompany any grilled meats, with thick soups or stews, or other meals.
- Sweets. Serve with honey or brown sugar as a sweet dessert.
Storage & Reheating
Arepas are best enjoyed fresh, while they’re warm and crisp. Store any leftover cooked arepas in an airtight container in the refrigerator for up to 3-4 days.
To reheat, warm them in a hot skillet for a few minutes per side until heated through and crisped back up. You can also reheat them in a 350°F oven for 8-10 minutes, or in the air fryer at 350°F for 4-6 minutes. Avoid microwaving if possible, as it can make them soft or chewy.
You can also freeze cooked arepas. Let them cool completely, then wrap them individually and freeze for up to 3 months. Reheat from frozen in the oven or air fryer until warmed through.
If making stuffed arepas, store the arepas and fillings separately when possible so the arepas don’t get soggy.


 Easy, creamy and cheesy Hominy Casserole is a side dish.